|
Table Terrarium/Vivarium
Supplies Needed
a)*Four: 2by4 boards - 3ft,4inch long
b)*Four: 2by4 boards, 1ft,5inch long
c)*Four: 2by4 boards - 2ft,6inch long
d)*Two: half inch ply board - 3ft,4inch length, 1ft,8inch width
Door Dimensions:
e)*Two: 1inch by 2inch board - 2ft,3inch long
f)*Three: 1inch by 2inch board - 1ft,9inch long
g)*One: plexiglass 1ft,5inch width, 2ft length
h)*Three to four: hinges
i)*One: 2inch by 1inch board - approx. 2ft,3inch long
j)*Two: greenhouse lighting fixtures, 20" to 34" fluorescent bulbs, doubles or singles.
k)*Siding: Options of plastic sheeting, plexiglass, screen mesh meant for windows or fine, galvanized metal netting (wire
mesh)
*drill, screws, staple gun, duct tape
Note: Plexiglass is allot easier to cut with a hot knife. So far I still can't find a hot pen that I could really use
quite often, but heating a smooth edged kitchen knife off of the stove will work. It sounds like a chore, compare it to cutting
plexiglass with a glass cutter.
If you intend to use the table for very high humidity terrarium/vivarium I recommend lining the inside entirely of plexiglass
and using aquarium silicone glue on all the meeting sides and edges to prevent all the wood from eventually rotting from water
damage.
Note:
*If you plexiglass the door like I show, there should be an intentional space between its plexiglass and the table where air
gets in and humidity out even with a strip of duct tape across the top of the door as a guard. This would act like having
to open a lid on a glass covered vivarium. As well, you might consider a mister and/or a hand-sized fan for a terrarium this
size. You'd also need some kind of escape routes through the panel material for plug cords.
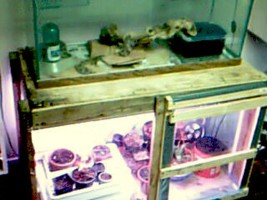
A very sturdy, hardy table that just isn't going anywhere and can potentially handle a heavy tank on top of it.
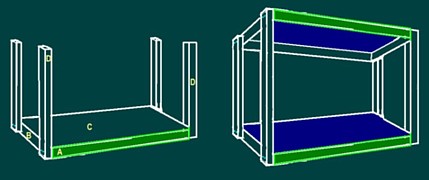
A/B: Making two rectangular frames, screw A as the outside board, with B on the inside. It should be standing or rather the
2" width side down and the 4" width side tall.

C: Fit each ply board over the top of each frame and screw it down making a table. The tables should be ply wood side up.
Or rather, the frame boards making empty space between it and the ground.
Note:
If you want the option, you can turn the bottom table upside down, where the plywood will touch the floor. I prefered mine
off the floor. I could have also made the bottom table without using one of the B boards with room down there to slide things
under it like a 2" tall pan or flat storage containers.

D: Using the bottom table, screw each board level with each corner of the table on the outside of the frame, like legs. Or
rather, where A/B meet. The 2" width side even with A board but the 4" width on the side of B board.
Flip the table over to one long side and screw the top table in place in the same manner, the A/B boards level to the top
of the D (leg) boards without the D boards being any higher than to the bottom of the C ply board.
Note:
This would be a good time to apply J the lighting fixtures to the bottom of the top table, at least getting the screws in
the right place to attach the fixtures later. Doing it afterwards is pretty awkward, cramped and sweaty.
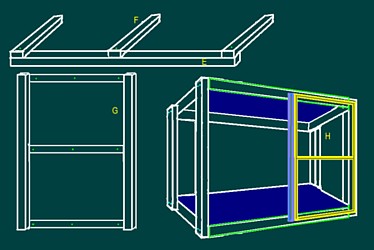
Making the Door
E/F make a rectangular frame with the 2inch side down, a flat frame. Over lay F board (across) on top of the E board (Down).
Add the third F board in the middle of the frame just like the other F boards (across)
G - Turn the frame over so the F boards are on the ground and place the piece of plexiglass inside the frame. Pre-drill holes
and screw in place.
H - Brace the frame against one side of the table at the very edge and apply the hinges on the outside.
I - Close the door and brace this board against the side of the door length wise and screw in place. It will act as the door-stop
and framing for the rest of that side for the table. You can use it to apply a small latch.
J - now is more or less a last warning to apply at least the screws for the lighting that goes on the 'ceiling' for the bottom
table.
K - You can use any of the materials for whatever you intend to use the table for. I put another sheet of plexiglass beside
the door frame and lined everything else with plastic sheeting, strengthening the edges with duct tape and using a staple
gun.
I also lined the bottom with plastic sheeting but you can also make a floor frame for the inside as something to completely
soil substrate.
A Flooring Frame
*Measure the inside for a 1by4 board frame. After making the frame, 4" side tall, make a table out of it using plexiglass
over the frame, even to every side. Pre-drill holes and screw in. Turn it over and line the inside of the frame with 4" tall
strips of plexiglass, getting the glass to meet that of the bottom as snuggly as possible. Pre-drill and screw in place. Use
aquarium silicone glue to make the inside edges between plexiglass water tight and slip it into the table.
If you set it on top of some bricks before you set it inside the table, you can use the false bottom to put in pans of water
to keep moisture up and cut down a little on the constant watering.
*For a bird cage you could use the same principle as the plexiglass table and use it as an easy slip-out pan for bottom cleaning.
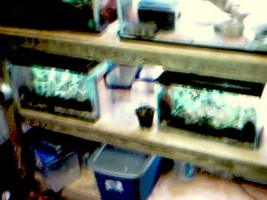
The Shelves
Are basically the very same principle with three tables. It's 5ft by 9inches length, 1ft,5inches width and 3ft,8inches in
height. If I ever needed to move it or decided to turn a table upside down to have the frame up and bottom down, I could just
unscrew the 2by4's holding the tables up by the outside.
Drill the bottom table to the frame boards first, then turn it to its longest side and measure the middle table into place,
screw it on before adding the top table.
I went with the tables having their frame sides down. If I added lighting to a 'ceiling' they could act as shade for myself
from the distraction, or if I made the middle or bottom shelf a full vivarium it could act as a nice place to hide for a climbing
animal like a gecko. That would have to be with the lighting on the outside, other wise I could just plexiglass or wire mesh
critters away from the lighting fixtures using the frame. It's also easier for if I wanted to close it up and apply some doors
without being the best carpenter in the world.
You can just as well turn them over and use the table frames as drop-guards or line them with plexiglass without making a
second inner frame. Fill it with sand and keep an iguana or snake in plenty of room.
Make dividers and turn the shelves into tanks without a single aquarium, they're just virtually limitless in ideas and easy
enough to put together or take apart. If you don't like the idea of their weight, just use 1by4's instead.
|